Why did I build an electric guitar from a kit? Let me admit upfront that I can barely play a guitar at all. For me, building an electric guitar was on my bucket list for several years. I like the idea of building things from scratch to learn about what makes them work. But building an electric guitar from scratch requires more woodworking skills than I have. Even if building the guitar body is potentially something I could do on my own, the neck — particularly the fretboard — is far beyond my abilities.
While you can buy pre-made necks, it’s not really “from scratch” at that point. So I rationalized that I’d might as well go with a kit to avoid going too far down the rabbit hole.
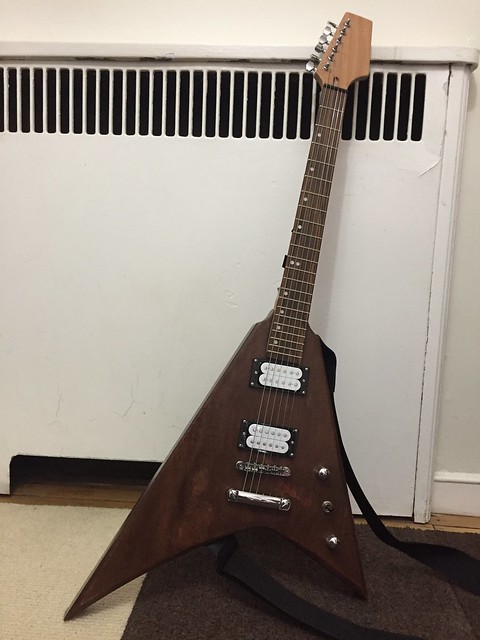
The kit I got is similar to a Gibson “Flying V” though the headstock has in-line tuners like you might see on a Fender. It was sold by a company called Albatross Guitars, which I think sources their parts from various factories in China.
Oh, and no instructions were included.
Here’s what the guitar kit looks like in the box, though keep in mind I’d already taken it out and examined the parts a few times at this point.
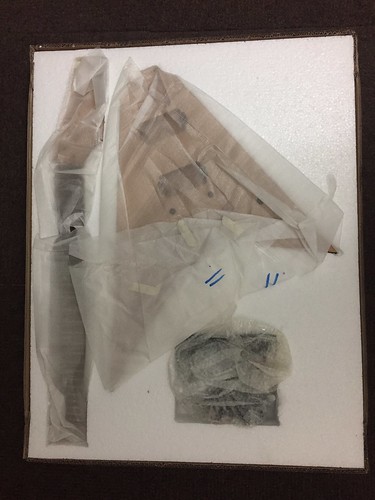
With the exception of the strings, the parts were of much higher quality than I was expecting. I’d read many horror stories online about people trying to build kit guitars only to find that many components were unusable. The issues I ran into were mostly cosmetic, and even the tangled and bent-up strings weren’t a total loss, as we’ll get to in a moment.
Sanding
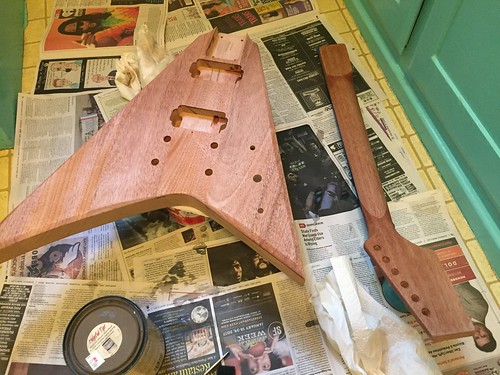
The first step was sanding the wood. The body had clearly been sanded down to some extent already but it was still rough, particularly on the sides. I started with a 220 grit sandpaper, and after a few passes worked down to a 500 grit in some areas. I wanted to leave it slightly textured partially to give it a natural look, but mostly because so it would have some grip to the surface for holding it.
The neck didn’t require much sanding, but it had other imperfections. The very top of the headstock had a minor dent that I sanded out with the 220, and I took a single pass with the 500 grit over the rest. There was still another problem though; the hole for the truss rod adjustment screw had a big splintery dent in it.
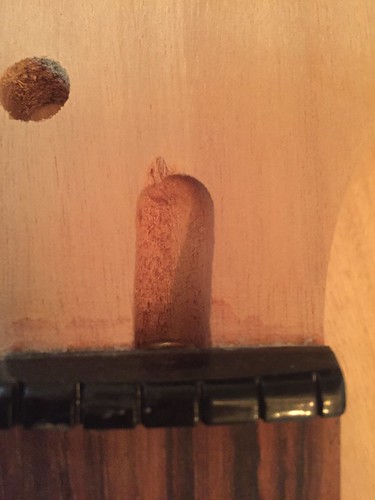
I used my Dremel to grind out the defect, then sanded it down.
The nut also had a minor scratch in it, but the only fix there would be to replace it. This didn’t seem worth the hassle to me.
Staining
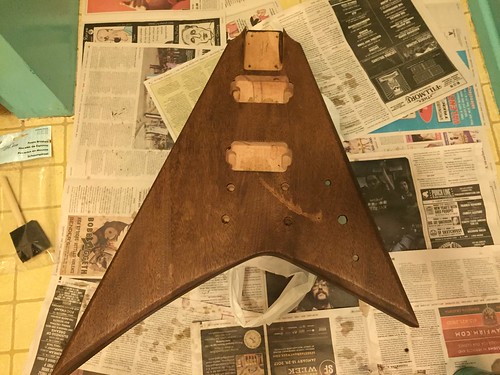
The rosewood fretboard was already stained, but the rest of the wood was unfinished. So I put painter’s tape over the edge of the fretboard and got to work. Originally I’d intended to use the same light water-based stain on both the neck and body. But I found the neck and body took on very different color characteristics — while the neck looked great with the light color, the body turned a sort of sickly gray color as it dried.
Fortunately it’s trivial to take lightly stained wood and make it darker; you just need to apply a darker stain over it. Unfortunately, none of my local hardware stores sold any water based stains in darker colors.
So let’s talk about the difference between oil and water based stains. Water based stains are a newer category, and they work a little bit like a super runny nail polish. Like any stain you just brush it on, mop up any excess with a rag, and repeat. It smells bad for an hour or so, but water based stains are relatively harmless.
Oil based stains are a different matter completely. You generally only want to use these outside, because they smell like death and are flammable. The smell takes a good ten hours or so to dissipate.
I didn’t have the option of working outside because my apartment building is being retrofitted, and the outdoor area is currently off limits during the day. My only option was to get up early, open all the windows, and apply the oil based stain before heading to work. Not ideal, but I was too impatient to wait 16 months or so for the construction to be complete.
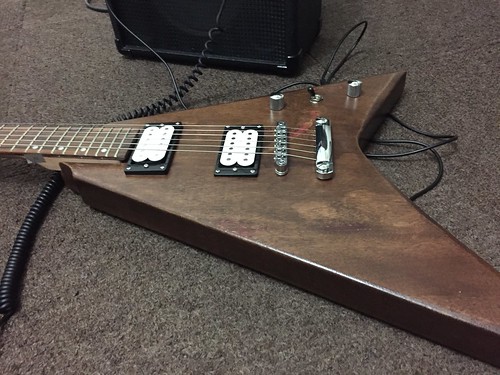
The darker stain revealed a pretty nasty “scar” on the front of the guitar body that runs under the bridge. Despite several attempts to cover it with more stain, it didn’t help at all. If anything it made it a bit worse.
At first I wasn’t happy with the scar and thought about covering it with a sticker or something. As time went on though I found I was fine with it. I’ve got plenty of actual scars myself, who am I to complain?
Once the stain was dry, I applied a water based polyurethane over both the body and neck. I applied several layers, sanding a bit between each application as recommended by the manufacturer. I did my best to avoid blotchy drips, but still had to sand down a couple of those anyway and reapply in a couple of spots. It happens.
Assembly
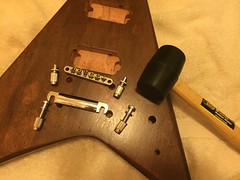
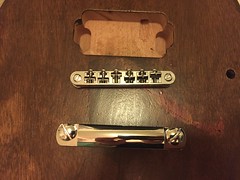
Once the wood was ready to go, I pounded the metal recesses that hold the bridge in place. This guitar has a two-part bridge, with the bottom part that holds the string and the top part that creates the ridge that the strings stretch over as separate parts. Many guitars have a single piece that does both. It’s a matter of design preference.
To pound in the metal recesses, I didn’t want to damage the wood or the chrome, so I went to the hardware store down the street and asked to buy a mallet. The only employee working there wasn’t familiar with the term “mallet,” so I described it as a “rubber hammer” and she immediately knew where to find it. Sometimes simpler language is better.
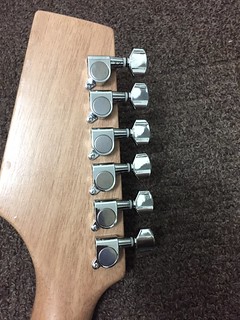
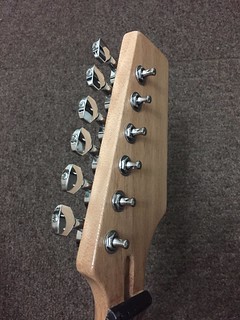
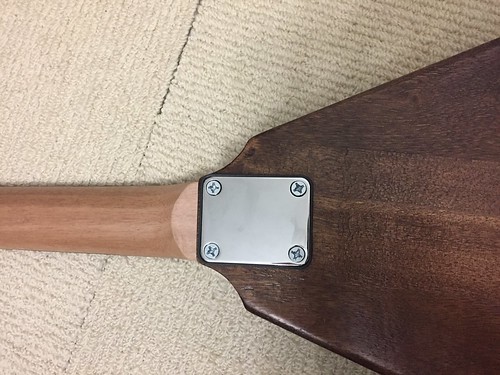
The tuners were a breeze to install, each one had an associated nut to screw in, then a tiny screw in the back to hold them in place securely.
Next, I stuck the neck into the body and… it didn’t quite fit. A couple rounds of sanding the inside of the neck pocket and it was ready to go. But not quite.
After tightening the neck on all the way with screws, I realized there was a pretty serious problem. I tried putting in a couple of the poor quality strings included in the kit, only to find that they were flush with the frets! For all intents and purposes this makes the guitar unusable.
If you’re not familiar with how fretted stringed instruments work, let me explain. Frets are those metal bumps in the neck. When you put a finger against a string, it stretches the string over the fret below it, that’s what changes the pitch — you’re effectively “shortening” the length of the string. With this arrangement, the string would essentially be stuck against the lowest fret. Not gonna work.
Ideally you want about maybe a quarter centimeter between a fret and the strings, so my first thought was that the neck was too thick where it goes into the body. Why? Part of me suspected that this guitar body was originally intended to have another layer on top of the front. This is actually quite common with electric guitars.
A manufacturer might use a cheaper wood for the main body, then cover it up either with a layer of higher quality wood, or a plastic pick guard. Either way that thin layer would have meant the bridge sat slightly higher and pulled the strings up. Both methods would have hid the aforementioned scar as well.
Made sense to me. And it turned out to be completely wrong.
After shaving a couple of millimeters off the neck wood, I’d made no progress. Somehow the strings were still pressed against the neck. What was going on?
To make a long story short, a week later I pulled out a ruler and was shocked to discover the neck hole on the body was cut at an incline! The part toward the bridge was a full 2-3 millimeters higher than the part towards the head. Oops.
Lacking the woodworking tools to correct this problem in the guitar body, I decided to go in the additive direction this time. I superglued a piece of a used fake leather belt that I’d originally bought at Goodwill for my homemade Assassin’s Creed costume, into the top of the neck hole.
When I’d removed the original screws I’d stripped them a little. To be on the safe side, I bought a new set of wood screws at a local hardware store. The original screws turned out to be the oddball size of 10 x 1 – 3/4. I got a small box of stainless steel screws of this size for about $1.50.
After screwing in the neck a second time it was finally straight. I put the strings back in to confirm that the alignment was correct.
Installing the pickups
There wasn’t a whole lot to do to get the pickups installed, but before we delve into that, let me clear up a couple of misconceptions I had about how they work.
First, although they look like electromagnets, pickups are just regular plain magnets like you’d stick on your refrigerator. (You can easily prove this by unplugging an electric guitar and sticking a screwdriver against them to see that it sticks.) The wiring wrapped around the magnets isn’t creating the magnetic field, it’s actually measuring it. So you can think of it kind of like a microphone that measures the magnetic field instead of air pressure.
Second, the pickup is the entire row of magnets, not the individual magnets. In fact, some electric guitars have one long magnet instead of six individual ones. Incidentally, this is why pretty much every guitar you’ll ever see has the strings slightly “misaligned” in relation to those six magnets — the placement doesn’t need to be exact. The magnets act in concert to form a single field.
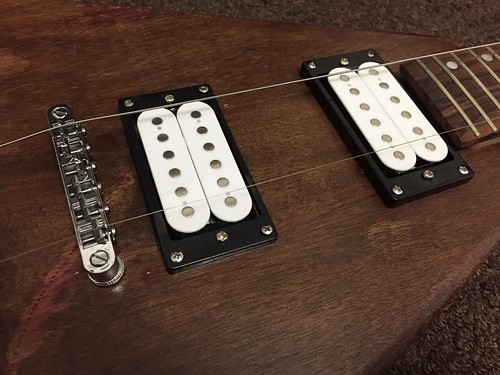
This particular kit comes with dual-coil pickups, also known as humbuckers. As the name suggests, this type of pickup reduces (or “bucks”) the feedback (or “hum.”) Most often, this feedback is generated by the 60 Hz signal coming out of your electrical appliances.
Single-coil pickups will generate some feedback if not properly shielded. The dual-coil design eliminates the need for this with two magnetic fields that cancel one another out. One row of the pickup’s magnets faces north, the other south. This results in a type of noise reduction called phase cancellation.
Of course, musicians can use electric guitar feedback intentionally. One example of this is Mayonaise by The Smashing Pumpkins, a song famously built around a cheap guitar’s feedback.
Sometimes the neck and bridge pickup will have different electrical characteristics to get a desired sound. In my case I measured the pickups on my ohmmeter but couldn’t find any real difference in resistance between the two, so I arbitrarily decided to install the one with the red wire by the neck, and the one with the yellow by the bridge. (The only reason I’m including the color here is in case I forget and need to remember later.)
Using a ruler and the strings for reference, I lined up the pickups as best I could and screwed the plastic plates they were attached to into the body of the guitar.
Wiring
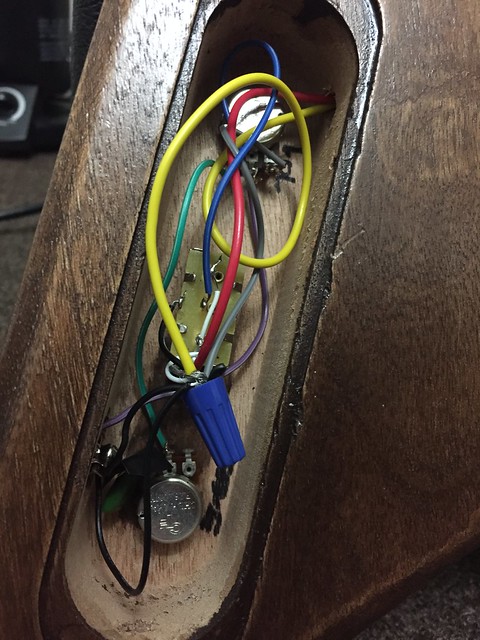
To reiterate, this kit did not come with instructions. No wiring diagrams, nothing.
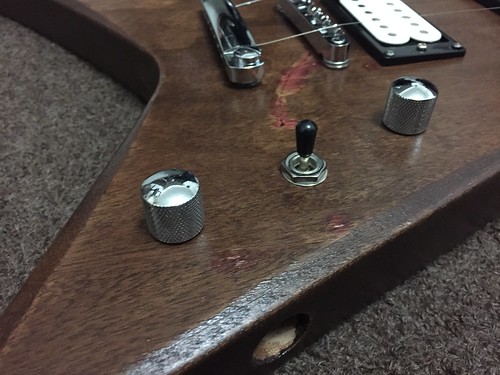
Thankfully, I found a number of resources online about how to wire electric guitars. One diagram in particular matched what I had — two pickups, a switch, a volume knob, and a tone knob. This is the one I used.
First I soldered wires onto both parts of the jack, then I soldered in the pickups and the knobs. I quickly wound up with something that worked… occasionally.
The problem turned out to be the negative wires. There were so many of them that I’d wound up soldering them all together into one big mess. If I pushed on them slightly the whole thing worked right, but it was clearly untenable.
After removing most of the solder, clipping some of the wires, and replacing one wire entirely, I headed over to RadioShack (did you know RadioShack still exists?) and bought a pack of assorted twist-on wire connectors. The connector cap twisted on over the negative terminals perfectly fine, and the wiring was good to go. I put the plastic plate over the wiring cut out and screwed it in.
Overall I’m impressed with how simple it was to wire up the guitar. Then again it’s not like electric guitars are a particularly new technology. Anyone with rudimentary electronics and soldering skills could wire one together with a little effort.
Strap and strings
With the exciting work done, I finally put in a new set of strings and purchased a new strap as well. Oddly, the kit came with strap buttons (these are the metal nudges that the strap attaches to) that were not mentioned in the description.
After some time on Google, I found that the classic Gibson Flying V design usually had one button in the inside “wing” of the v-shape, on the upper side facing the player; and the other built into the metal base plate that the neck screws go into.
Well, my neck plate didn’t have that, instead I had two screw-in strap buttons that I could mount essentially anywhere on the body. One piece of advice that a number of guitarists had suggested on forums was to place the right strap button closer to the middle of the v-shape rather than toward the end like Gibson tends to do. For the other one I wasn’t quite sure and wound up screwing it in on the opposite side near the neck. I’m not sure this is ideal and I may wind up revisiting it, but it seems workable. At the very least, I don’t have the common complaint about the Flying V design where the neck tends to “droop” while you’re wearing the strap.
Testing
Aside from testing that the guitar makes sounds without crackling on my cheap, used Fender amp, I also plugged it into my computer and tested with Rocksmith 2014. If you’re not familiar with Rocksmith, it’s basically the same as games like Guitar Hero or Rock Band, but instead of using fake instruments, you use real ones and learn to play guitar or bass guitar along the way.
Once I got the electronics working steadily and not making a “crackling” sound due to shoddy wiring on my part, I was able to tune the guitar using Rocksmith and play around with it. At that point, I considered the project complete.
Conclusion
In under a month I assembled an electric guitar kit without any instructions. Despite various small setbacks, I now have a new guitar. More importantly I learned quite a bit along the way — which was, after all, the point.
Should you built a guitar from a kit? It depends what your goal is. I think I got lucky, the kit I got was better quality than some, though it still has its quirks. You should also ask yourself what your skill level is. If you’re moderately handy with assembling and fixing things, you could probably build a kit like this. If anything goes wrong there’s plenty of info out there on the internet, and you can always get replacement parts if needed.
I’d caution that this isn’t for the faint of heart. If you aren’t at least somewhat familiar with an electric guitar already, you should borrow or buy one — plenty of used electric guitars on Craigslist — to familiarize yourself with the basics before jumping into something as crazy as building your own. Especially if there’s no instructions.